Replication Hyper-V – Failover Hyper-V
The situation described below involves a Host A=SRV2022 server that will have to replicate to the Host B=SRV2023 server, both Windows Server 2019, in failover mode
Hyper-V Replication provides 2 authentication methods:
- Kerberos
- HTTPS certificates
The first authentication method can only be used if Hyper-V hosts are joined to a domain. In our case, however, we will use the second method by having 2 stand-alone servers, in a separate network that does not reach the domain controller.
REQUIREMENTS
1. Physical servers must be reachable to each other and resolve each other’s names correctly. If you do not have a DNS server where you can create the 2 A records, you need to create the 2 records in the HOSTS files of the physical servers
2.Enable the rule in firewalls, in allowed apps: “HTTPS Replica Hyper-V” (“HTTPS Replica Hyper-V Listener (TCP-In)”)
3.If you do not use public CAs for certificates, you need to generate a root certificate on one of the 2 physical servers, in our case SRV2023 and a client certificate for the authentication of the second server.
 The rule in firewalls, in allowed apps: “HTTPS Replica Hyper-V”
1 – CREATE THE CERTIFICATES
Go to the second host server that will accept the replicas and via Powershell run these commands
Generate the root CA certificate using CN= the server name (in our case SRV2023):
New-SelfSignedCertificate -Type "Custom" -KeyExportPolicy "Exportable" -Subject "CN=SRV2023 Root CA" -CertStoreLocation "Cert:\LocalMachine\My" -KeySpec "Signature" -KeyUsage "CertSign" -NotAfter (Get-Date).AddYears(10)
NW: add the commands for the duration of the certificates, in our case 10 years (otherwise they last 1 year): -NotAfter (Get-Date).AddYears(10)

Copy the “Thumbprint” of the new certificate.
(In our case the Thumbrint is CD0FAF39F87F654F737DE26107C3B6343213BAC8)
Generate client/server authentication certificates:
Use the name of the physical server as the CN and use the thumbprint of the root certificate. In our case we will generate two certificates that will be chosen in the respective Hyper-V consoles: SRV2022 and SRV2023.
Then type the command for the first client/server authentication certificate for server A:
New-SelfSignedCertificate -type "Custom" -KeyExportPolicy "Exportable" -Subject "CN=SRV2022 " -CertStoreLocation "Cert:\LocalMachine\My" -KeySpec "KeyExchange" -TextExtension @("2.5.29.37={text}1.3.6.1.5.5.7.3.1,1.3.6.1.5.5.7.3.2") -Signer "Cert:LocalMachine\My\ CD0FAF39F87F654F737DE26107C3B6343213BAC8" -Provider "Microsoft Enhanced RSA and AES Cryptographic Provider" -NotAfter (Get-Date).AddYears(10)
Command for the second client/server authentication certificate for server B:
New-SelfSignedCertificate -type "Custom" -KeyExportPolicy "Exportable" -Subject "CN=SRV2023 " -CertStoreLocation "Cert:\LocalMachine\My" -KeySpec "KeyExchange" -TextExtension @("2.5.29.37={text}1.3.6.1.5.5.7.3.1,1.3.6.1.5.5.7.3.2") -Signer "Cert:LocalMachine\My\ CD0FAF39F87F654F737DE26107C3B6343213BAC8" -Provider "Microsoft Enhanced RSA and AES Cryptographic Provider" -NotAfter (Get-Date).AddYears(10)

Power shell promt image with the CA certificate with thunbprint and 2 Client/Server Certificates
2 – EXPORT THE CERTIFICATES AND IMPORT THEM
Open the certlm.msc shell on server B
move the CA certificate to the “Trusted Root Certification Authorities” folder so that it is considered valid.

Export the SRV2023 CA issued by SRV2023 and the client/server certificate for SRV2022 server issued by SRV2023 as below image:

For the CA certificate choose the .cer format and save it

For the client/server certificate, choose the .pfx format and save it, setting a password when requested
At this point copy the two certificates to server A (SRV2022).
Install the CA certificate on server A first:
right-click on the certificate, choose the “Install Certificate” option, “local computer” path and “Trusted Root Certification Authorities”
Install the Client/Server certificate on server A second:
right-click on the certificate, choose the Install Certificate option, path “local computer” and “Personal”
3 – DISABLE THE VERIFICATION OF CERTIFICATE REVOCATION
Type the following commands on all physical servers:
reg add "HKLM\SOFTWARE\Microsoft\Windows NT\CurrentVersion\Virtualization\FailoverReplication" /v DisableCertRevocationCheck /d 1 /t REG_DWORD /f
reg add "HKLM\SOFTWARE\Microsoft\Windows NT\CurrentVersion\Virtualization\Replication" /v DisableCertRevocationCheck /d 1 /t REG_DWORD /f
4 – SET UP THE HYPER-V REPLICA OF SERVER A ON THE DESTINATION SERVER B
In the Hyper-V console of server B, destination of the replication, open the “Hyper-v Settings” and go to “replication configuration“, enable replication, choose the SRV2023 client/server certificate issued by CA SRV2023 and set the path of the archives
5 – SET UP THE HYPER-V VM REPLICATION ON SERVER B ON THE SOURCE SERVER
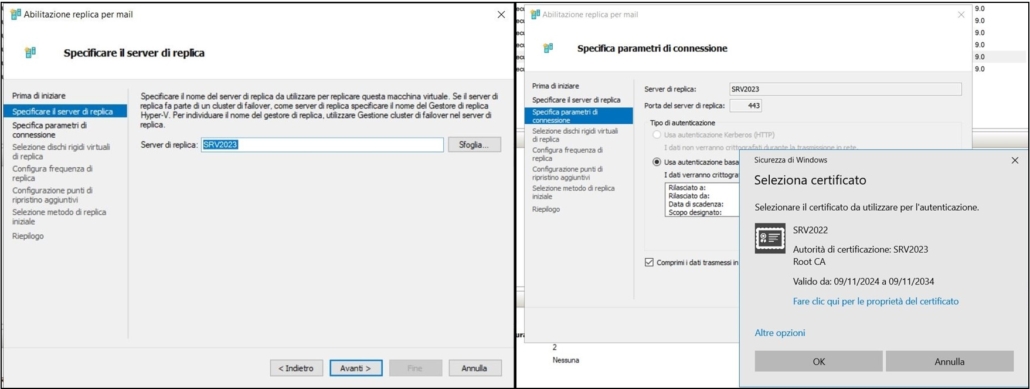
On the source host server, in our case SRV2022, right-click on the virtual machine to be replicated and choose “Enable replication…”, type the name of the replication destination server, choose the correct certificate

Choose the disks to replicate and the frequency of replication

Choose the number of replicas to keep and when to start the initial replication

Check the summary and confirm
The VMs chosen for replication will appear on the replication target server in the Hyper-v console
Before starting the initial copy, you can decide on the storage locations. Right click on the VM and choose “move”

At this point, once the initial copy has been completed, the replications will take place with the chosen frequency.
Author: Fabio Querzè


